Computing image filters with wgpu-rs
This post describes creating a simple image processing pipeline with compute shaders, using wgpu-rs and Rust .
Getting started
You probably already know this, but your GPU (aka your Graphic Processing Unit - your graphics card if you have one) does not only render graphics, but is also capable of computing regular algorithms. Yup, you can use your GPU to calculate a fibonacci sequence if that is your fancy.
One of the things that your GPU excels at is parallel computation, as they are optimized to render multiple pixels at once.
Accessing the power of the graphics cards for computing used to be fairly complex:
- As usual, Nvidia has its own proprietary library, CUDA.
- OpenCL is an open source and free parallel programming API made by the Khronos group (also responsible for OpenGL and Vulkan, all the cool stuff).
- Android implemented their own compute API, RenderScript.
Nowadays, each rendering API has their own solution as well. You can do GPU computation using
- Metal on Apple.
- DirectX 11+ on Windows.
- Vulkan everywhere.
In the Rust ecosystem, wgpu-rs is a great library that will abstract these different backends, and allow you to write portable GPU computation code that will run everywhere (hopefully, I'm currently only trying the code on a Windows machine without a means to really test portability).
Who is the target of this article? Beginners in GPU programming like me, with some notion of
Rust, who like the idea of using their GPU for something else than graphics, but are mostly tinkering and wondering what they are doing every step of the way.
Creating a basic grayscale filter
The plan is simple:
- Take a sample image.
- Load it in the graphics card as a texture.
- Apply a compute shader to calculate a grayscale version of it.
- Retrieve the resulting image and save it to disk.
A couple of dependencies...
Let's start with creating a new project.
As always, this will create a new Rust project, including a Cargo.toml file and a hello world main.rs file.
Let's edit the Cargo.toml file and add all the dependencies we will need.
[]
= "image-filters"
= "0.1.0"
= "2021"
[]
= "1.0"
= "1.9"
= "0.24"
= "0.2"
= "0.14"
So, what are those?
wgpuis obvious.imagewill allow us to load a png file, decode it, and read it as a stream of bytes.bytemuckis a utility crate used for casting between plain data types.anyhowis here so we can rethrow most results as this is just sample code.pollsteris used here as several function inwgpuare async.pollsterlets you block a thread until a future completes.
Wgpu basics
Let's get started in the main method.
We return an anyhow::Result to simplify error handling, and declare usage of pollster::FutureExt so we can block_on() the async calls easily.
We then create the device and the queue.
- The device represents an open connection to your GPU, and we will use it later to create the resources we need (like textures).
- We will use the queue to issue commands to the GPU.
let instance = new;
let adapter = instance
.request_adapter
.block_on
.ok_or?;
let = adapter
.request_device
.block_on?;
This is fairly standard:
- you create your instance, requesting any backend. You could instead specify the one of your choice, like
wgpu::Backends::VULKAN. - when creating your adapter, you can specify your power preferences. Here, I ask for
HighPerformance, but you could also chooseLowPerformance. - you then create your device and queue, and they will come in handy later for every operation.
We use pollster here to block on request_adapter and request_device methods, as they are async calls.
Loading the texture
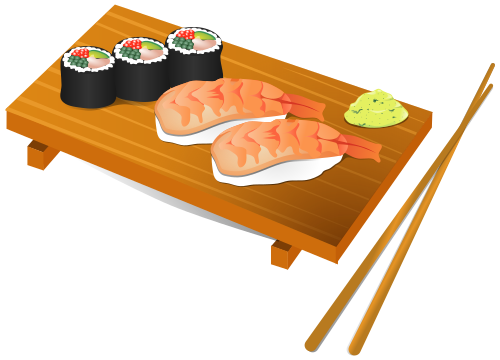
For simplicity, we shall work with a png file and include it as bytes in the source code.
let input_image = load_from_memory?.to_rgba8;
let = input_image.dimensions;
Using the image crate, we load the sushi image, and make sure it is using the rbga format.
Using the device, we then create a wgpu texture.
let texture_size = Extent3d ;
let input_texture = device.create_texture;
- No mipmapping or multi sampling are used here, so we keep
mip_level_countandsample_countto 1. - Its usage specifies:
+
TEXTURE_BINDING: the texture can be bound to a shader for sampling, meaning we will be able to retrieve its pixels in our compute code. +COPY_DST: we can copy data into it. And we need to copy data into it, as the texture is currently empty. - The format is another interesting beast: several formats are supported by
wgpu. UsingRgba8Unormmeans that the texture contains 8 bit per channel (aka a byte), in the r, g, b, a order, but that the u8 values from [0 - 255] of each channel will be converted to a float between [0 - 1].
queue.write_texture;
We copy the image data to the texture, which we can do as we declared the texture usage COPY_DST .
Every pixel is made of 4 bytes, one per color channel, meaning that bytes_per_row is 4 times the width of the image.
Creating an output texture
We will use an output texture to store the grayscale version of our image.
let output_texture = device.create_texture;
Its usage is slightly different:
COPY_SRCinstead ofCOPY_DST, as we will copy from it later to retrieve our filtered image.STORAGE_BINDINGinstead ofTEXTURE_BINDINGto indicate that it will be bound in a shader as a place to store the computation result.
Shader time
Shader what?
A compute shader is a set of instructions that will be given to your GPU to tell it what calculations are needed.
In the same way that a CPU program can be written in multiple languages (Rust, C, C++, ...), a GPU program can be written in multiple languages (GLSL, HLSL, SIR-V, MSL) that need to be compiled as well.
It could be a mess, but wgpu uses a universal shader translator, naga , that allow you to write your shader in wgsl or glsl , and make sure they are properly converted for each backend.
If you run your program on an Apple computer using the metal backend, your shader will be translated to the metal shading language (or msl ) automagically.
With all that being said, let's take a look at our wgsl instructions to convert an image from color to grayscale.
[[group(0), binding(0)]] var input_texture : texture_2d<f32>;
[[group(0), binding(1)]] var output_texture : texture_storage_2d<rgba8unorm, write>;

[[stage(compute), workgroup_size(16, 16)]]
fn grayscale_main(
  [[builtin(global_invocation_id)]] global_id : vec3<u32>,
) {
    let dimensions = textureDimensions(input_texture);
    let coords = vec2<i32>(global_id.xy);

    if(coords.x >= dimensions.x || coords.y >= dimensions.y) {
        return;
    }

    let color = textureLoad(input_texture, coords.xy, 0);
    let gray = dot(vec3<f32>(0.299, 0.587, 0.114), color.rgb);

    textureStore(output_texture, coords.xy, vec4<f32>(gray, gray, gray, color.a));
}
Contrarily to the CPU approach, where we would write one piece of code that iterates on every pixel to calculate its grayscale value, the compute shader will be a piece of code that runs concurrently on each pixel.
We declare two variable, input and output texture, that match the textures we created in Rust . The output is of the type texture_storage_2d , with the same rgba8unorm type as before.
Our grayscale_main function declares a workgroup size, but more on that later.
The rest is straightforward:
- Get the coordinates of the current pixel.
- Get the dimensions of the input image.
- If we are out of bounds, return.
- Load the pixel.
- Calculate the gray value of said pixel.
- Write it to the output texture.
Having chosen the
Rbga8Unormformat for our textures, the colors are retrieved as a float between 0 and 1, and we don't need to cast them when multiplying the r, g and b values to figure out the grayscale value. If we had chosen instead theRbga8Uintformat instead, textureLoad would instead return a color of typevec<u8>, keeping the values between 0 and 255, and we would first need to cast them to float, before multiplying them and recasting them to unsigned byte before writing down the output.
Loading the shader and creating the pipeline
Okay, back to Rust!
let shader = device.create_shader_module;
let pipeline = device.create_compute_pipeline;
Our shader is loaded as text. We specify our entry point, matching the grayscale_main function in the shader.
Bind group
We then proceed to creating our bind group: it is the Rust representation of the data that will be attached to the GPU:
In the shader, we annotated our input_texture with [[group(0), binding(0)]] . We must now tell our Rust code what it corresponds to.
let texture_bind_group = device.create_bind_group;
For the group 0, we match our input_texture to the binding 0, and our output_texture to the binding 1, just like in the shader!
In this example, we bind two textures, but we could also bind data buffers or a texture sampler if we wanted.
pipeline.get_bind_group_layout(0)automatically creates a bind group layout for us, based on the shader. Alternatively, we could create the bind group layout by hand instead, to be even more specific. It is out of scope here, so let's ignore that for this article.
Workgroup and dispatch
Workgroup ?
Didn't I tell you that we would speak about workgroup?
A workgroup is a set of invocations which concurrently execute a compute shader stage entry point (here, our main function), and share access to shader variables in the workgroup address space.
In our shader, we specified a workgroup of dimension 16 by 16. It can be seen as 2D matrix of instructions executed at once. In our case, 16 by 16 equals 256. Our shader will process when running 256 pixels at once! Take that, sequential computing!
Of course, our image is a bit bigger than 16x16, so we need to call this compute shader multiple times to handle every single pixel.
How many times exactly? Well, we simply divide the width and height of our image by the workgroup dimensions, and it will tell us how many times we need to run this 16x16 matrix to cover everything.
Let's have a simple helper method for that:
This method makes sure that there will be enough workgroup to cover each pixel.
If we had a width of 20 pixels and a height of 16, using the workgroup of dimension 16 by 16, we would be missing a band of 4 pixels by only creating a single workgroup. We would need to create a second workgroup to handle the extra pixels, and we would then be able to cover 32 pixels in width.
Some work will go to waste, but it is better than not applying our filters to a band of pixels.
Dispatching
We will need a command encoder to chain our different operations:
let mut encoder =
device.create_command_encoder;
And now we create our compute pass, set our pipeline, bind our textures, and dispatch our work to the GPU!
Dispatching tells wgpu how many invocations of the shader, or how many workgroups, must be created in each dimension.
For a picture of 48x32 pixels, we would need to dispatch 6 workgroups: 3 in the
xdimensions times 2 in theydimensions.
dispatchtakes a third argument, set here to 1: workgroup can also be defined in three dimensions! But we are working on 2d textures, so we won't use it.
Global Invocation Id
So how do we go from workgroup to pixel position?
Simple: we used in the shader the global_invocation_id built-in variable! The global_invocation_id gives us the coordinate triple for the current invocation's corresponding compute shader grid point. Hum, I feel that is not helping so much. Let's just say that it multiplies the current workgroup identifier (our dispatch action creates several workgroup, and gives to each of them a x and a y ) with the workgroup size, and add to it the local_invocation_id , meaning the coordinates of the current invocation within its workgroup.
Let's start again with our 48x32 image. 6 workgroup will be created, with ids (0, 0), (1, 0), (2, 0), (1, 0), (1, 1) and (1, 2) When the workgroup (1, 0) is running, 256 invocations will be running in parallel, with their own local identifier within the group: (0, 1), ... (0, 15), (1, 0) ... (7, 8) ... (15, 15).
If we take the invocation (7, 8) of the workgroup (0, 1), its global invocation id will be (0 * 16 + 7, 1 * 16 + 8), meaning (7, 24). Which gives us the coordinate of the pixel this specific invocation will work on.
Fetching our result
Fetching our results will be done in three steps:
- we will copy our texture to a buffer.
- we will map our buffer, so it's available to the CPU.
- we will recreate an image from the buffered data.
Copying our texture to a buffer
encoder.copy_texture_to_buffer;
Wait what? What is this padded_bytes_per_row ? Where does that come from?
I guess we need to speak about padding.
Similarly to the method we used to copy our image to a texture, we must here specify the number of bytes we copy per line (or row) of our texture.
There is a caveat though: This bytes_per_row argument must be a multiple of 256, or the function will panic.
Reading the doc for this method states:
/// # Panics -
source.layout.bytes_per_rowisn't divisible by [COPY_BYTES_PER_ROW_ALIGNMENT].
COPY_BYTES_PER_ROW_ALIGNMENT is equal to 256. So we need to calculate a number of bytes per row that is a multiple of 256 and that is equal to the closest multiple of 256. Damn.
Let's take our 48x32 image again. Its width is 48. There are 4 bytes per pixel, so we would want to read 4 x 48 = 192 bytes per row.
192 is not a multiple of 256, so we take the next multiple of 256 that fits 192. In this case, well, that is 256. It will be our
padded_bytes_per_rowvalue.
Let's write a helper method to calculate that.
/// Compute the next multiple of 256 for texture retrieval padding.
Let's set padded_bytes_per_row and unpadded_bytes_per_row (we will need it too).
let padded_bytes_per_row = padded_bytes_per_row;
let unpadded_bytes_per_row = width as usize * 4;
We call the copy_texture_to_buffer :
encoder.copy_texture_to_buffer
Time to submit work!
Up until now, we have been declaring to wgpu the work we want to be done, and we have added all of our compute commands to the encoder. But nothing has happened yet!
Time to queue all of that work.
queue.submit;
By doing so, we tell wgpu to start processing the command of the encoder asynchronously.
Mapping the data
Let's map our data, and wait until the submitted actions have been completed.
let buffer_slice = output_buffer.slice;
buffer_slice.map_async;
device.poll;
We need to wait on poll , to make sure that the submitted instructions have been completed and that the data is available in the mapped buffer.
map_async takes a callback, which probably should be used in real production code to check for errors. For this article, I'll just ignore it (bad, bad, bad).
We can then access the data:
let padded_data = buffer_slice.get_mapped_range;
At this point, we have a slice of data that is padded to 256, and we need to convert it to our regular unpadded data. So let's create our final pixels:
let mut pixels: = vec!;
for in padded_data
.chunks_exact
.zip
We create a Vec<u8> to contain our final data, and copy line by line our data, only considering the unpadded data.
Finally, let's save!
if let Some = from_raw
We are done!
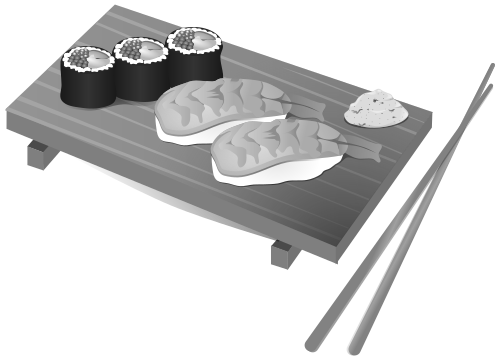
Output
After all this work, you have it! The gray sushi!
Final thoughts
So, is it worth it?
You tell me! For this example in particular, definitely not! Iterating over an array of pixels, running an O(n) algorithm to change the color to gray... a CPU will do such a good job that it is not worth the trouble of writing all that code.
But it was a fun thing to do!
An obvious caveat to this approach is that there is a limit to the texture size one can load in a GPU. For example, on Vulkan, the max width and height of a 2d texture is 4096 pixel.
If you wanted to load an image that was bigger than that, (like, if your camera as a 48 megapixel resolution, and your photos are 7920x6002 pixels), you would need to write some extra code to split your image into smaller chunks, and reassemble the result.
A few links
First of all, if you want to build it and run it yourself, you will find the code here:
I made a few other filters for fun, including a slightly more involved gaussian blur:
Several useful links:
- wgpu-rs - homepage for the
wgpu-rsproject. - Get started with GPU Compute on the web - it helped and inspired me to write this article.
- The sushi picture, by gnokii - royalty free sushi.
- WGSL Spec - read the doc, it helps!